How to Create a Wood Slat Wall: A Stylish DIY Upgrade for Your Home MABA MassachusettsRealEstate MaBuyerAgent FirstTimeHomeBuyers
Looking to add a touch of modern warmth and texture to your home? A wood slat wall might be just the design upgrade you’ve been searching for. This trending feature is popping up in homes of all styles and for good reason. It offers a sleek, architectural look that instantly elevates a space, whether it’s in the living room, hallway, or even a home office. Best of all, it’s a project many homeowners can tackle over a weekend with basic tools and a little patience. Here’s how to create a stunning wood slat wall that can wow buyers or simply boost your own enjoyment of the space.
Choose Your Wall and Measure It Out
Start by selecting the wall you want to transform. Accent walls work best think behind a TV, entryway, or behind the bed. Measure the height and width to calculate how much material you’ll need. Slats are typically made from wood like pine, oak, or poplar and spaced evenly to create visual rhythm. Be sure to factor in spacing when calculating the number of slats required.
Pick the Right Materials
Decide whether you want to stain, paint, or leave the wood natural. Pre-sanded slats will save you time, but you can also cut them from plywood strips for a more budget-friendly option. Many homeowners use 1×2 or 1×3 boards for the slats, depending on the desired look. You’ll also need construction adhesive, nails or a nail gun, a level, and a measuring tape.
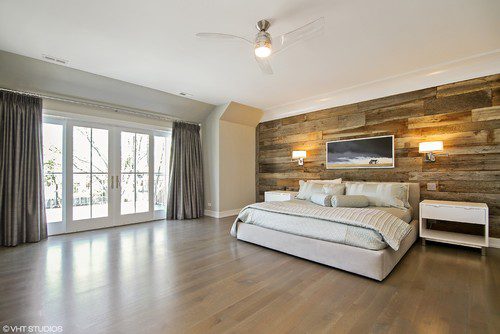
Prepare the Wall and Paint the Backdrop
Before installing slats, paint the wall a dark color (usually black or charcoal) to enhance the look of the negative space between the wood strips. This step adds depth and gives the slats a clean, modern finish. Allow the paint to dry completely before starting installation.
Install the Wood Slats
Start from one edge and work across the wall, applying adhesive to each slat and securing it with nails. Use a spacer (such as a wood block) to ensure consistent gaps between slats. Make sure each slat is level as you go. Continue the process until the entire wall is covered, then stand back and admire your new focal point.
Finish the Look
Once all slats are installed, you can fill any nail holes with wood filler and touch up with stain or paint. If your slat wall is near baseboards or crown molding, consider trimming the ends for a seamless look. Add lighting or décor to really make the wall stand out.
A High-Impact Look with DIY Simplicity
A wood slat wall is a simple yet sophisticated way to upgrade your home’s interior. Whether you’re refreshing a space for personal enjoyment or adding modern appeal before putting your home on the market, this DIY project offers great visual impact for relatively low effort and cost. With just a few tools and a free weekend, you can create a custom accent wall that adds both warmth and style one slat at a time.

FIRST TIME HOMEBUYERS
HOMEBUYERS BEWARE! Book Review
This book is an excellent first step in a complicated process.

BEWARE the cards are stacked against you! Get Tom Wemett's book, learn why are different from other
Buying a home is like buying a car, on steroids. It’s the biggest investment you are likely to make so the stakes are incredibly high. I knew that having an agent represent me was a good idea.
What I hadn’t grasped was how important it is to find one who is not connected with the selling side in any way—through an agency that also represents sellers, as most do, at least in Mass. In researching buyer agents, I found Tom through the Mass. Assoc. of Buyer Agents (MABA).
Get Started with MABA
For no extra cost, let a MABA buyer agent protect your interests
800-935-6222 Call now!
How to Make Better Homebuying Decisions

Who Pays a Buyer’s Agent?

![]()